Sunday 1 July 2012

Sunday morning buttermilk pancakes that were someone else's great idea

Straight after posting about the frozen cream, I walked into the kitchen and made these bad boys.
It took 30 minutes and we ate them straight with maple syrup from our trip to Vermont. And so, I must make a confession.

It is my intention with this blog that I will not just do a cut and paste job of other people's hard work in writing recipes. My intention is that I will adapt them in some way, either through my own cack-handedness of forgetting to buy something or by thinking 'I don't think that is necessary', trying out that thought and passing on to you the results. 
In this case however, the recipe was so fantastic (literally stripped down to its core components and ready to go) that I have added nothing to it. So I must begin this post by saying that this is all someone else's hard work. I even thought twice about posting it as I didn't think it was fair to grab anyone else's limelight but I felt that if I posted about it in the vein of 'this is a foolproof, gold star recipe of xxxx person' then it was ok.

Here is the recipe, which I came across via Joanna Goddard's eclectic and extremely friendly blog Cup of Jo
As I say, I did nothing but followed it and it was great. I had everything already in the house apart from the buttermilk so it really is a great recipe in that it needs so little prep.
My husband commented on the lightness of the pancakes and I think it is due to the recipe's insistence not to overwhisk and to use a fork. A really good bit of advice.
Mix dry ingredients which are 1 cup all-purpose flour, 2 tablespoons sugar, 1 teaspoon baking powder, 1 teaspoon baking soda, ¼ teaspoon kosher salt). I actually forgot the salt and had no baking soda so in the interests of honesty I have not bolded them as I did not use them. But in the interests of not messing around with someone else's great recipe, those are what you should use. But they turned out fine with 3 out of 5.
 
Mix wet ingredients which are 1 tablespoon unsalted butter, melted and slightly cooled
That poor pan is literally dying before my very eyes.

1 ¼ cup buttermilk, shaken, 1 large egg, ½ teaspoon pure vanilla extract. I managed to include all of these!
 Then wet ingredients meet dry ingredients
All some very gentle forking takes place. The recipe states that it should be barely combined, with some lump action taking place. This made me nervous as I have been schooled in the 'no lump' way but in the interestst of actually following the darned recipe, I let those lumps roam free.

As you can see, pan avec melted butter ready to go. I dropped in two tablespoons-worth of batter (I used a metal spoon rather than the 1/4 cup the recipe suggested as the mix looked a bit claggy and I envisaged only 1/8 cup actually ending up in the pan). I didn't touch them, just watched and then bubbles started appearing. Based on my experiences making blinis, it is the bubbles that form where the batter has contact with the pan, basically your pancake perimeter, that indicate that the base is sealed and verging on being ready to flip. 
These fellas need longer. 

I also need to point out that these are far too big for the pan in terms of effective flipping so one or two got a bit cropped when I flipped them into the side of the pan. But those bits fell off and cooked so I ate them. I have very little patience to cook things one by one and will always try and cram in one more than the recipe says. But in this case, it was ok as we got the pancakes double-quick and I got to eat mini-pancakes as I was frying. 

So thank you to the lovely recipe-maker lady and to Jo for posting the recipe in the first place. 

It is a good 'un.

Spitting and spurting: home-made caramel frozen cream

This is not ice-cream. It is cream that is frozen but it has no egg yolks, and no darned ice-crystals to battle with whilst trying not to freeze your fingertips to the base of the freezer. So that's an upside, both for those who don't like raw eggs or cryo-emergencies. It still feels like I've committed a fraud and really shouldn't be calling it ice-cream. Hence the cumbersome frozen cream name. But it is delicious, and once you get the thing in the freezer, it is complete, save the waiting. 

So, making the caramel (this is actually step 4 of the recipe but I wanted to get to the good stuff first). I used a recipe that the author called dry-burn technique. I think this is rather a disingenuous name because if you hit burn then you've overshot. But then dry-melt sounds like an oxymoron. Anyway, the basic premise is very simple. Sugar in pan. Add heat. Look at it.


The amount of sugar to pan diameter meant that I had quite a thick layer so you could see sections of the sugar start to caramelise and then at this point I folded in the surrounding sugar that had not yet started. I had this at quite a low heat as caramelising sugar can be smoky, capricious and death to your pan. 
I hope you are reading this first without having some sugar on the go as I want to point out that there are several preceding stages that you must get done. You may be, like me, someone who will open a recipe book, embark on steps 1-3, have pans boiling and then read step 4 that says 'taken the xxx that has been resting overnight'. Reading recipes to the end is a definite 'good thing to do', like flossing and recycling. So here it is.

RECIPE 
Pour 2 cups whole milk into a bowl. Take 2 tablespoons and mix with 1 1/2 tablespoons cornstarch in a seperate container (I used a I heart NY mug).
Whisk 2 ounces cream cheese with 1/2 teaspoon salt. Remember to take the cream cheese out of the fridge a good 5 mins before you attempt this or all that happens is you skim off the edges of the cold hard cream cheese and spatter them on your front and the surrounding walls. Once again, I used a handheld whisk when really I should have used an electric beater. It seemed such a small amount to use the big proper whisk and the handheld worked, although a non-electric would probably work better and give you less spattering. Oh, and ignore the bowl I used in this picture. It was a terrible choice and I transferred it all to a larger metal mixing bowl.

Mix 1/4 cups heavy cream with 2 tablespoons corn syrup. I used homemade sugar syrup which I have in the fridge for (ahem) cocktail emergencies. This is just sugar melted in boiling water. 

Ok, so now these are all on stand-by, get to your caramel which you make by dry-burning/melting 2/3 cup sugar. Really, it was just a case of pouring the sugar into the pan, turning on the heat and watching it until you start to see the dark caramel at the edges, then fold in the unmelted sugar.
Once all the sugar is combined, take off the heat and add a small pour of the cream/syrup mix. It may pop and spit a bit so stir stir stir. Add some more cream/syrup, stir, add more cream/syrup, stir, until all added.

Return to the heat, pour in the milk and bring up to rolling boil, which is my favourite kind of boil as it that nice controlled 'boiling cauldron' type effect.

Keep this up for 5 minutes (bit less is fine) then take off the heat again and whisk in your milk/cornstarch mix (I used a fork as my whisk was busy hanging out with the cream cheese).
Return to the heat, bring up to gentle boil and stir until it thickens slightly (one minute). The thickening was, like the pickle, minimal but definitely thicker than heavy cream if that helps?

Find your mixing bowl with cream cheese, pour in the caramel cream and whisk together. Now. In the recipe I used, there was vanilla essence in the ingredients list but I could not find where it got added. So I added in 2 tablespoons of vanilla essence at this point. I also put in another grind of salt for good measure.

The whole mixture was then put in the sink that was filled with cold water and left to cool. My husband actually has bottles of frozen water in the fridge for his beer making so I used those but I am not about to suggest you go to that level of preparedness. 

This makes about one quart of caramel cream which I poured into a plastic container that we had (from where, I have no idea) but I think a good robust ice cream tub should work as well. And would be thematically consistent. As this recipe needs no stirring to break down crystals then it does not need to be a shallow container I guess (I haven't tested this). We then went out for dinner and three hours later it was set and delicious. 

Adapted from Cooking Channel TV online recipe for Salty Caramel Ice Cream which was itself 'excerpted' from Jeni's Splendid Ice Creams at Home by Jeni Briton Bauer.

Saturday 30 June 2012

And so it begins: in a pickle

In a way that may become horribly familiar to you all over the course of this blog, I started something without thinking it through properly (seriously, that appears to be my modus operandi in the kitchen). I started cooking and then decided to document it once all the lovely 'vegetables straight from nature's larder' photo opportunities had passed, because I'd already chopped up the darned things.
I will endeavour to be, to quote Shakespeare, a little less arse about face for future entries. (please note: Shakespeare didn't write that).  

But what can I show you? 


Yep, that's it. No orangey-red tomatoes with their green veins. No beets and their plummage. No fluttering clouds of grated horseradish. Just tin-foil, one hob in desperate need of a scrub, and some orange smash in a seive. 

But what I want to say, I couldn't have done in pictures anyway. And that is: pickles are (ahem) THE BEST FOOD FOR SUMMER. Says the woman who had 3 cold showers today and may yet fit in a fourth. Yes that's right, we're in the middle of a heatwave (which I think New Yorkers just call 'summer'). And I decide to roast vegetables. Roast, as in 350F for an hour plus. I literally prepared the veg/fruit, whacked them in the oven with oil and seasoning and then had to go stand in front of the airconditioner for 10 minutes. But the beauty of roasting is you're done. Smushing and pureeing aside, that's your them-there pickle up in those photos. Ok, there was some horseradish and the inevitable chemical warfare vapour cloud of boilng vinegars to deal with but man, it is worth it. Because now the oven can stay off, and we can munch on bread cheese and pickles. Like so...
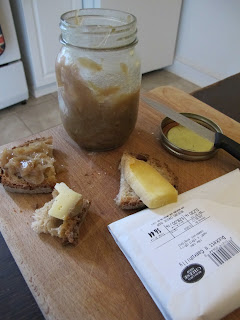
Even with the 34C degree heat (sorry for the switching temps but the oven says one thing and BBC Weather another) I marched on down Brooklyn's hipster equivalent of Times Square, Bedford Avenue, and got some cheese. And that pickle is last week's onion pickle. Le voila...


Tasty brown mush. And here is today's tasty purple mush


I must say that it is not a lot of pickle for 7 tomatoes and 8 small beets. But it should last us a little while. And it is just so darn satisfying to make. As vinegar and sugar are cheap, as is veg from the farmer's market, think of it as Austerity Condiments. Which sounds like a character from Jeeves & Wooster.
p.s. as for the title, the trend of bad, food-themed, puns may stop. Maybe 

RECIPE
2 pounds tomatoes, roasted in olive oil at 350F with 6 cloves of garlic
2 pounds beets (scrubbed and wrapped in foil), roasted in olive oil at 350F
Push tomatoes through a sieve. Most of the garlic got nuked but what was not carbonised also got added to the tomato mulch.
Puree beets. I need a food processor. I used a handheld soup blender
1 1.4 cups granulated sugar, 2/3 cup vinegar (I used cider), a good slug balsamic, 2 ounces grated fresh horseradish in a large saucepan, bring to the boil. I recommend not grating the horseradish over the pan that you have the vinegars in. Well, I do and I don't. It is amazing from an aroma perspective but quite a nasal onslaught. Oh, for large saucepan, I used a heavy-bottomed pot (is that what they are called?)
Stir in tomato sauce and cook for a few minutes
Add beets and cook for another 10 minutes. The recipe mentioned that some 'thickening' should be going down at this point but nothing happened for me. 
Spoon into sterilised jar (which I sterilised by filling with extremely hot water, then leaving to dry upside down on a clean tea towel). Seal. Wait a bit, then pop in the fridge. Enjoy the lid going pop when you open it.


Adapted from The River Cottage Preserves Handbook by Pam Corbin

Starting out

Hello
So, today makes the start of a new online adventure: blogging about cooking.
I've been doing one of those things for quite a while now so I thought it was time to upscale the experience.
And basically I was left alone in the house with a pan and a camera so, really, where else was I going to end up?
This blog is going to be about my experiences in cooking. My experiences are solely, wholly, motivated by greed. I see something, I want to eat it, ergo I want to make it. The 'seeing' can be something on a menu, in a magazine or, more often, I see a component, a potential ingrediant, that makes me think 'I want to eat that, in combination with some other elements, to be determined'. So, here it goes